 Save to Pinterest
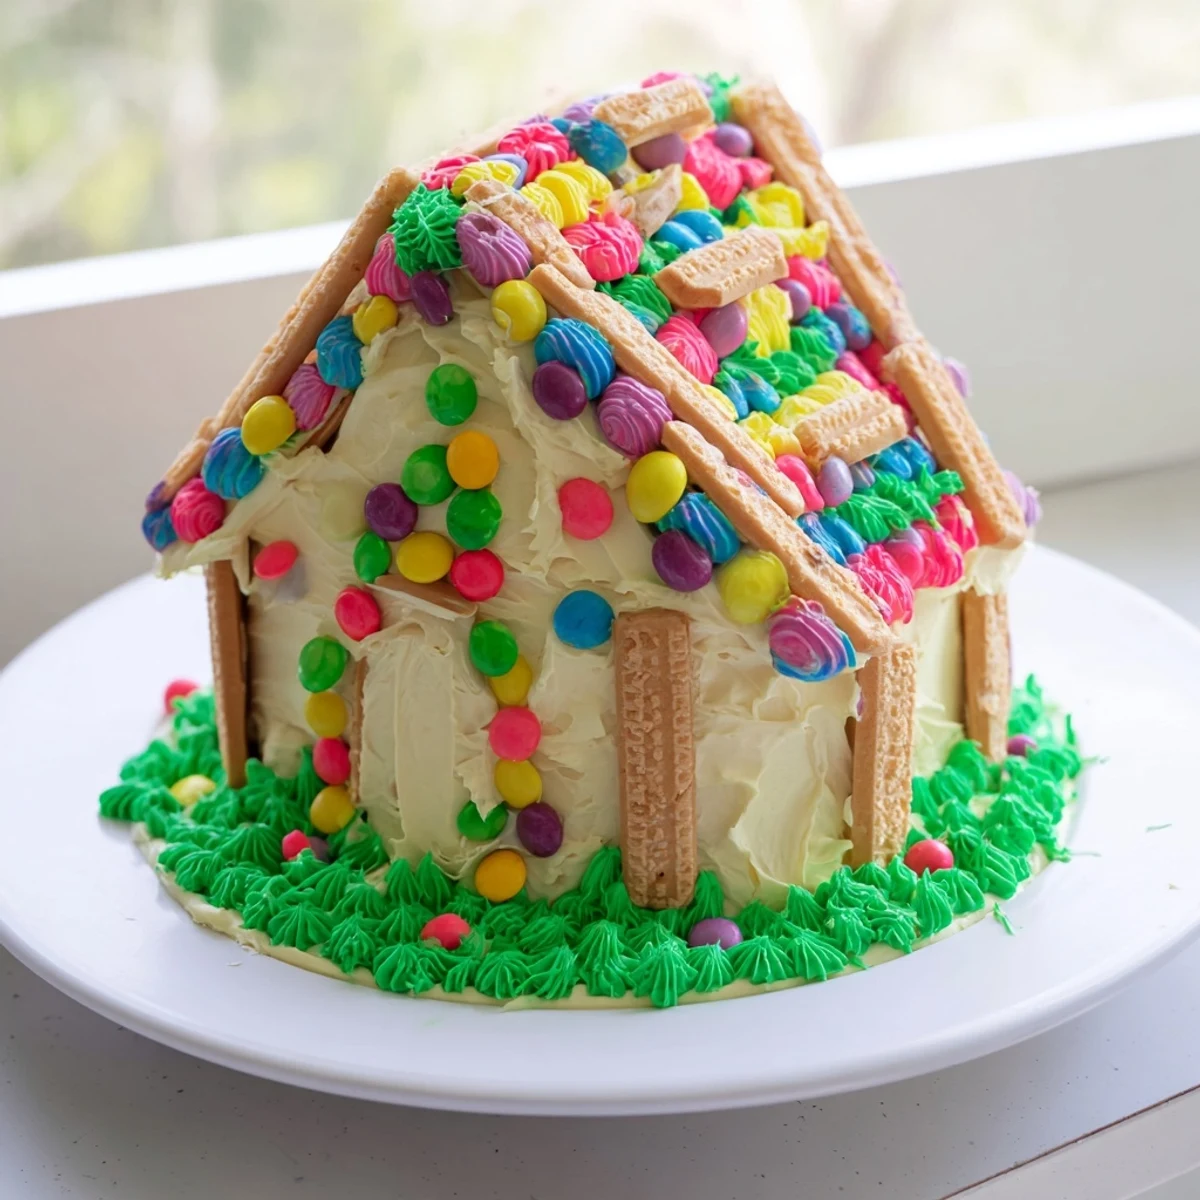
 This cake features a tender vanilla sponge baked to perfection in a rectangular pan. The batter is enriched with butter, sugar, eggs, and vanilla for a moist texture. After cooling, it's skillfully shaped and decorated like a whimsical house using colored buttercream frostings and candy accents. Perfect for festive occasions, the colorful decorations include candy tiles, wafer cookies, and optional green coconut grass. The result is both a delicious dessert and a visually captivating centerpiece, ideal for celebrations and gatherings.
My daughter came home from school with a hand-drawn picture of a gingerbread house, and I realized she'd been dreaming about making one for weeks. The moment I saw those colored pencil details—tiny windows, a crooked door, candy scattered everywhere—I knew I had to build something real for her birthday. This cake isn't just dessert; it's a edible canvas where kids and adults become architects of something magical.
The first time I made this, I was nervous the cake would crumble when I cut it into shapes, but the crumb turned out sturdy and forgiving. My son's friend asked why we were cutting up a perfectly good cake, then came back for thirds once the house was assembled and decorated. That's when I realized this recipe works because it bridges the gap between impressive and actually delicious.
Ingredients
- All-purpose flour: The foundation of a tender sponge that holds together when shaped; make sure it's sifted to avoid dense patches.
- Baking powder: Creates the lift that makes each bite light and fluffy, not heavy.
- Unsalted butter: Room temperature is non-negotiable; cold butter won't cream properly and you'll lose airiness.
- Granulated sugar: Beaten with butter for several minutes, it aerates the batter and creates that signature tender crumb.
- Eggs: Add them slowly, one at a time, so the batter stays emulsified and doesn't break.
- Vanilla extract: Use pure vanilla, not imitation; the flavor difference matters in something this simple.
- Whole milk: The acidity balances the sweetness and keeps the cake moist without being dense.
- Powdered sugar: Sift it before mixing into the buttercream to eliminate lumps that ruin smooth frosting.
- Food coloring gels: Use gels, not liquids, so the colors stay vibrant without thinning the buttercream.
- Candy decorations: Candy-coated chocolates stick best to buttercream and won't melt as quickly as chocolate chips.
- Wafer cookies or chocolate sticks: These add architectural detail and texture to your edible house.
Instructions
- Prepare your stage:
- Preheat the oven to 350°F and grease a 9x13-inch pan with parchment paper so your cake lifts out cleanly. Having everything ready means you won't scramble once mixing begins.
- Mix dry ingredients separately:
- Whisk flour, baking powder, and salt in one bowl so the leavening distributes evenly throughout the cake. This one step prevents dense spots.
- Cream butter and sugar until fluffy:
- Beat for at least 3 minutes; you're incorporating air that makes the cake rise and feel light in your mouth. Stop when the mixture looks pale and ribbony.
- Add eggs one at a time:
- Let each egg fully incorporate before adding the next, beating for 30 seconds after each addition. This keeps the batter emulsified and prevents separation.
- Alternate dry and wet ingredients:
- Start and end with flour, adding dry and milk in three turns each. Stir just until combined; overmixing develops gluten and makes the cake tough.
- Bake until golden:
- Pour batter into the pan and smooth the top gently. Bake 30-35 minutes until a toothpick comes out clean; the edges should look slightly set but the center still moist.
- Cool properly:
- Let the cake sit in the pan for 10 minutes so it firms up enough to flip, then turn onto a rack to cool completely. Warm cake falls apart when you cut it.
- Make your buttercream:
- Beat butter until creamy, then gradually add powdered sugar so it doesn't cloud everywhere. Add vanilla and milk until you reach a spreadable consistency.
- Color your frosting:
- Divide buttercream into bowls and add food coloring gel drop by drop, stirring until the color is even and the shade you want. Remember that the color deepens slightly as it sits.
- Cut and arrange your house:
- Once the cake is completely cool, cut it into rectangles for walls and triangles for a roof, arranging pieces on a serving board or plate. Think of it like playing with building blocks.
- Frost with purpose:
- Apply a base coat of buttercream to each piece, then frost the assembled house as a whole for a cohesive look. Use an offset spatula for smooth walls and decorative swirls.
- Decorate and set:
- Place candy tiles on the roof, candies for doors and windows on the walls, and wafer cookies for fencing and details. Chill the cake briefly so the decorations set firmly before serving.
 Save to Pinterest
 I'll never forget the moment my daughter stopped what she was doing and just stared at the finished house, then asked if we could make one for every holiday. The best part was that she helped frost it—not perfectly, but with real intention—and tasted every color of buttercream during the process. That's when a recipe becomes a memory.
Building Your Edible Masterpiece
The magic of this cake is that it doesn't require architectural precision or fancy tools, just patience and imagination. Start by sketching your house shape on a piece of paper so you know what pieces to cut, then arrange them on your serving board before frosting. If a piece breaks, it becomes a hidden piece under the roof or a detail you cover with candy—nothing is wasted, everything becomes part of the story.
Color and Decoration Ideas
The buttercream is your blank canvas; I've made houses with rainbow walls, pastel cottages, and bold primary colors depending on who was celebrating. You can pipe buttercream onto the cake for shingles, shutters, or garden details, or keep it simple with frosted walls and candy accents. The wafer cookies become fences, pathways, or wooden beams depending on how you place them.
Variations and Special Touches
If vanilla isn't your family's flavor, swap half the flour for unsweetened cocoa powder to create a chocolate house with richer, deeper tones. You can also add a tablespoon of almond extract to the buttercream for a subtle nod to classic baking, or infuse the cake with lemon zest for something bright and unexpected. Consider these options a starting point, not rules.
- Dye shredded coconut green with a few drops of food coloring for grass or garden accents around the base.
- Use sugar paste or fondant if you want more detailed decorations like shutters, door knobs, or window panes.
- Pair the cake with lemonade or fruity punch at your party so the lightness of the cake balances the sweetness of the buttercream.
 Save to Pinterest
 This cake teaches you that the most memorable desserts aren't the ones that look magazine-perfect, they're the ones that bring people together and give them permission to play. Make it, decorate it, eat it, and know that everyone at your table will leave with a smile.
Recipe Questions & Answers
- → What is the best way to achieve a moist vanilla sponge?
-
Use room temperature butter and eggs, and alternate dry ingredients with milk while mixing gently to avoid overworking the batter.
- → How can I create vibrant buttercream colors?
-
Use gel food coloring for rich, consistent hues without thinning the frosting texture.
- → What decorations work well for a house-shaped cake?
-
Candy-coated chocolates make great roof tiles, while wafer cookies or chocolate sticks can mimic fences and beams.
- → How do I assemble the cake pieces into a house shape?
-
Cut the cooled cake into rectangles for walls and triangles for the roof, arranging them carefully before frosting.
- → Can I prepare the cake decorations in advance?
-
Yes, the buttercream and candy accents can be prepared ahead and stored in a cool place until assembly.
